


はじめに
こんにちは、kanoです。
先日、JavaScriptのグリッドライブラリであるag-Gridを検証しました。
ag-Gridの機能は多岐に渡りますが、今回はグリッド間でデータをドラッグ&ドロップする機能の実装方法をご紹介します。
ag-Grid: Dragging Multiple Records Between Grids
https://www.ag-grid.com/javascript-grid-row-dragging-to-grid/#dragging-multiple-records-between-grids
完成イメージ
左側は選択候補のグリッド、右側は選択済データのグリッドです。
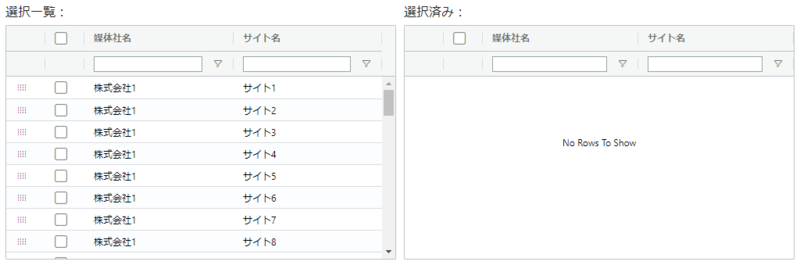
以下の操作を想定しています。
①任意のデータを選択

②左のグリッドから右のグリッドにドラッグ&ドロップ

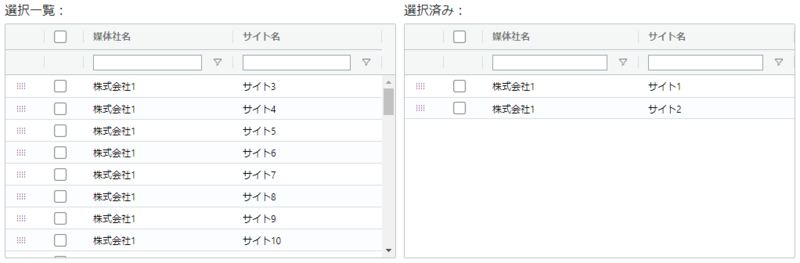
③右から左にドラッグ&ドロップして選択を取り消し
検証バージョン
- Vue.js:v2.6.11
- ag-Grid:v23.1.1
※有償版(ag-Grid Enterprise)
実装内容
ソースコードは以下です。
スクロールしてソースコード全体が確認できます。(ツールバーから新しいウィンドウでコードを開くことも可能です)
<template>
  <div>
    <div style=" float: left;">
      <h6>選択一覧:</h6>
      <AgGridVue
        style="width: 500px; height: 300px;"
        class="ag-theme-balham"
        :grid-options="leftGridOptions"
        :row-data="leftRowData"
        :modules="modules"
        @grid-ready="onLeftGridReady"
      />
    </div>
    <div style="float: left; margin-left: 10px;">
      <h6>選択済み:</h6>
      <AgGridVue
        style="width: 500px; height: 300px;"
        class="ag-theme-balham"
        :grid-options="rightGridOptions"
        :row-data="rightRowData"
        :modules="modules"
        @grid-ready="onRightGridReady"
      />
    </div>
  </div>
</template>

<script>
import { AgGridVue } from '@ag-grid-community/vue'
import { AllModules } from '@ag-grid-enterprise/all-modules'
import { SampleColumns, SampleData } from './SampleData.js'

export default {
  name: `Sample`,
  components: {
    AgGridVue
  },
  data() {
    return {
      leftGridOptions: null,
      rightGridOptions: null,
      leftRowData: SampleData(),
      rightRowData: [],
      modules: AllModules
    }
  },
  beforeMount() {
    // グリッドのオプションを設定(今回は左右全く同じ)
    this.leftGridOptions = {
      defaultColDef: {
        flex: 1,
        minWidth: 100,
        sortable: true,
        resizable: true,
        filter: true,
        floatingFilter: true
      },
      suppressKeyboardEvent: () => true,
      rowSelection: 'multiple',
      rowMultiSelectWithClick: true,
      enableMultiRowDragging: true,
      rowDragManaged: true,
      getRowNodeId: (data) => data.publisherId + '-' + data.siteId, // rowNodeIdがユニークになるように設定
      columnDefs: SampleColumns(),
      animateRows: true
    }
    this.rightGridOptions = {
      defaultColDef: {
        flex: 1,
        minWidth: 100,
        sortable: true,
        resizable: true,
        filter: true,
        floatingFilter: true
      },
      suppressKeyboardEvent: () => true,
      rowSelection: 'multiple',
      rowMultiSelectWithClick: true,
      enableMultiRowDragging: true,
      rowDragManaged: true,
      getRowNodeId: (data) => data.publisherId + '-' + data.siteId,
      columnDefs: SampleColumns(),
      animateRows: true
    }
  },
  methods: {
    // 左のグリッドのgridReadyイベント処理
    onLeftGridReady(params) {
      // ドロップゾーンの設定
      this.addGridDropZone(params, this.rightGridOptions.api)
    },
    // 右のグリッドのgridReadyイベント処理
    onRightGridReady(params) {
      // ドロップゾーンの設定
      this.addGridDropZone(params, this.leftGridOptions.api)
    },
    // ドロップゾーン設定処理
    addGridDropZone(params, dropZoneApi) {
      const thisGridApi = params.api
      const dropZoneParams = dropZoneApi.getRowDropZoneParams({
        // ドロップ終了後にドロップ元の該当行を削除
        onDragStop(params) {
          thisGridApi.applyTransaction({
            remove: params.nodes.map(function(node) {
              return node.data
            })
          })
        }
      })
      thisGridApi.addRowDropZone(dropZoneParams)
    }
  }
}
</script>
export const SampleColumns = () => {
  return [
    {
      rowDrag: true,
      rowDragText(params, dragItemCount) {
        // ドラッグ時に表示するテキストを設定
        return dragItemCount + ' rows'
      },
      maxWidth: 50,
      suppressMenu: true,
      filter: false
    },
    {
      checkboxSelection: true,
      headerCheckboxSelection: true,
      maxWidth: 50,
      suppressMenu: true,
      filter: false
    },
    {
      headerName: '媒体社ID',
      field: 'publisherId',
      hide: true
    },
    {
      headerName: '媒体社名',
      field: 'publisherName',
      filter: 'agTextColumnFilter'
    },
    {
      headerName: 'サイトID',
      field: 'siteId',
      hide: true
    },
    {
      headerName: 'サイト名',
      field: 'siteName',
      filter: 'agTextColumnFilter'
    }
  ]
}

export const SampleData = () => {
  const data = []
  // テストデータ:媒体社1~5に10サイトずつ紐付け
  for (let i = 1; i <= 5; i++) {
    for (let j = 1; j <= 10; j++) {
      data.push({
        publisherId: 'pubId' + i,
        publisherName: '株式会社' + i,
        siteId: 'siteId' + String((i - 1) * 10 + j),
        siteName: 'サイト' + String((i - 1) * 10 + j)
      })
    }
  }
  return data
}
〇実装のポイント
- GridOptions
- rowDragManaged:ドラッグの有効化
- getRowNodeId:左右のグリッドでrowNodeIdが同じになるよう、一意の値を設定
      rowDragManaged: true,
getRowNodeId: (data) => data.publisherId + '-' + data.siteId, // rowNodeIdがユニークになるように設定- ドロップゾーンの設定
- 左右ぞれぞれのgridApiを使用し、相互にドロップゾーンを設定
- ドラッグ&ドロップした際に、移動元のデータを削除する設定を追加
    // ドロップゾーン設定処理
    addGridDropZone(params, dropZoneApi) {
      const thisGridApi = params.api
      const dropZoneParams = dropZoneApi.getRowDropZoneParams({
        // ドロップ終了後にドロップ元の該当行を削除
        onDragStop(params) {
          thisGridApi.applyTransaction({
            remove: params.nodes.map(function(node) {
              return node.data
            })
          })
        }
      })
      thisGridApi.addRowDropZone(dropZoneParams)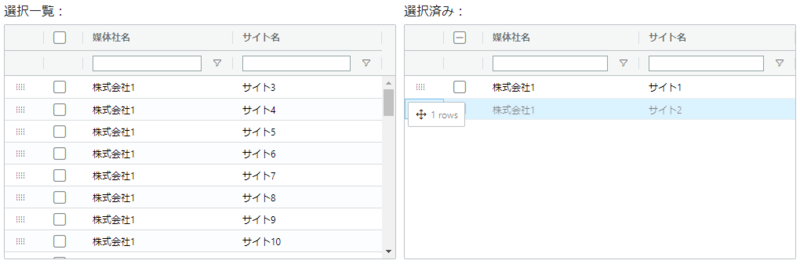
}- ドラッグ用のカラムを表示
- カラム定義にて、1つ目をドラッグ用のカラムに設定
※rowDragTextは選択行数を表すように設定しています。選択行のデータを表示したりとカスタマイズが可能です。
- カラム定義にて、1つ目をドラッグ用のカラムに設定
{
rowDrag: true,
rowDragText(params, dragItemCount) {
// ドラッグ時に表示するテキストを設定
return dragItemCount + ' rows'
},
maxWidth: 50,
suppressMenu: true,
filter: false
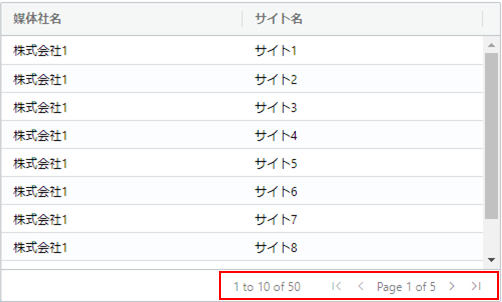
},注意点
通常、 gridOptions.pagination = true を設定することでページングが可能ですが、本機能との併用は不可のようでした。
おわりに
ag-Gridではグリッド間のドラッグ&ドロップが簡単に実装できることが分かりました。
この検証に伴い、コンテキストメニュー(右クリックメニュー)とショートカットキーのカスタマイズも行ったので、次回はその方法をご紹介したいと思います。